
環境
OS:centos6.4
文字コード変更
# cat /etc/sysconfig/i18n
LANG="en_US.UTF-8"
SYSFONT="latarcyrheb-sun16"

↓変更

LANG="ja_JP.UTF-8"
SYSFONT="ja_JP.UTF-8:ja_JP:ja"

ログオフ
タイムゾーンの変更
# cp -p /etc/localtime /etc/localtime.20130420
# cp -p /usr/share/zoneinfo/Asia/Tokyo /etc/localtime
# vi /etc/sysconfig/clock
    ZONE="Asia/Tokyo"

サーバを再起動させる。
ネットワーク設定
ネットワークの設定するファイル。
# vi /etc/sysconfig/network
NETWORKING=yes
HOSTNAME=localhost.localdomain
インタフェースに対しての設定ファイル
# vi /etc/sysconfig/network-scripts/ifcfg-eth0
DEVICE=eth0
BOOTPROTO=static
ONBOOT=yes
HWADDR=52:54:00:21:F6:F0
IPADDR=****
NETMASK=****
BROADCAST=****
GATEWAY=****
USERCTL=no
TYPE=Ethernet
UUID=28cfeeee-d577-42ea-b100-c9f1d26151d0
NM_CONTROLLED=yes
dns server設定
# vi /etc/resolv.conf
nameserver ******
ネットワークサービスの再起動
# vi /etc/init.d/network restart
※参考にしたサイト:http://kazmax.zpp.jp/network/net2.html
ntpserver
http://www.jitaku-svr.info/index.php?ntp_ntp.conf
ssh設定
iptables設定
# vim /etc/sysconfig/iptables
# /etc/init.d/iptables restart
hosts設定
# vim /etc/hosts
127.0.0.1  test.com  localhost localhost.localdomain
#::1         localhost localhost.localdomain
不要なサービスを停止
#chkconfig --list | grep "3:on";
#chkconfig auditd off
#chkconfig autofs off
#chkconfig bluetooth off
#chkconfig netfs off
#chkconfig nfslock off
#chkconfig postfix off

SELinuxの無効化
# getenforce

Enforcing ← SELinux有効状態
# setenforce 0

Permissive ← SELinux無効
# vi /etc/sysconfig/selinux
SELINUX=enforcing
↓
SELINUX=disabled
yum 自動アップデート
自動アップデートしたい場合、yum-cronをインストールする。
# yum install yum-cron
# chkconfig yum-cron on
# /etc/rc.d/init.d/yum-cron start
EPEL リポジトリ導入
# wget http://ftp.riken.jp/Linux/fedora/epel/RPM-GPG-KEY-EPEL-6
# rpm --import RPM-GPG-KEY-EPEL-6
# rm -f RPM-GPG-KEY-EPEL-6
# vi /etc/yum.repos.d/epel.repo
[epel]
name=EPEL RPM Repository for Red Hat Enterprise Linux
baseurl=http://ftp.riken.jp/Linux/fedora/epel/6/$basearch/
gpgcheck=1
enabled=0
ログ監視設定
ファイル改ざん検知ツール設定
AIDE(Advanced Intrusion Detection Environment)
AIDE は、オープンソースのホスト型侵入検知システム(HIDS)で、RHEL等主要なディストリビューションに含まれるパッケージ
※参考サイトhttp://d.hatena.ne.jp/mtbtaizo/20100125
インストール
# yum –y install aide

初期データベースの作成
# aide -i
# ll /var/lib/aide/

合計 1.8M
-rw-------. 1 root root 1741635  4月 20 15:32 2013 aide.db.new.gz

DB の名前変更
# cp /var/lib/aide/aide.db.new.gz /var/lib/aide/aide.db.gz
# aide -C
◆定期チェック
# vi /etc/cron.daily/aide
#!/bin/bash

MAILTO=root
LOGFILE=/var/log/aide/aide.log
AIDEDIR=/var/lib/aide
/usr/sbin/aide  -u > $LOGFILE
cp $AIDEDIR/aide.db.new.gz $AIDEDIR/aide.db.gz
x=$(grep "Looks okay" $LOGFILE | wc -l)
if [ $x -eq 1 ]
then
  echo "All Systems Look OK" | /bin/mail -s "AIDE OK" $MAILTO
else
  echo "$(egrep "added|changed|removed" $LOGFILE)" | /bin/mail -s "AIDE DETECTED CHANGES" $MAILTO
fi
exit
※参考サイト:http://d.hatena.ne.jp/mtbtaizo/20100125
ウィルス対策ソフト設定 Clam AntiVirus 導入
# yum -y --enablerepo=epel install clamd
# vi /etc/clamd.conf

root権限で動作するようにするため、以下をコメントアウトします。
User clam
↓
#User clam

# /etc/rc.d/init.d/clamd start

# chkconfig clamd on
ウィルス定義ファイル最新化。以後は/etc/cron.daily/freshclamにより毎日自動で行われる

# freshclam
ウィルススキャンテスト(ウィルスなしの場合)

# clamscan --infected --remove --recursive

結果
----------- SCAN SUMMARY -----------
Known viruses: 2163715
Engine version: 0.97.7
Scanned directories: 1
Scanned files: 0
Infected files: 0 ← ウィルス検知なし
Data scanned: 0.00 MB
Data read: 0.00 MB (ratio 0.00:1)
Time: 4.659 sec (0 m 4 s)

ウィルスありで実行してみる。

# wget http://www.eicar.org/download/eicarcom2.zip

#clamscan --infected --remove --recursive

/root/eicarcom2.zip: Eicar-Test-Signature FOUND ← ウィルス検知
/root/eicarcom2.zip: Removed. ← ウィルス削除

----------- SCAN SUMMARY -----------
Known viruses: 2163715
Engine version: 0.97.7
Scanned directories: 2
Scanned files: 11
Infected files: 1 ← ウィルス検知件数
Data scanned: 0.03 MB
Data read: 0.02 MB (ratio 1.75:1)
Time: 3.209 sec (0 m 3 s)

# vi virusscan

#!/bin/bash

PATH=/usr/bin:/bin

# clamd update
yum -y update clamd > /dev/null 2>&1

# excludeopt setup
excludelist=/root/clamscan.exclude
if [ -s $excludelist ]; then
 for i in `cat $excludelist`
 do
 if [ $(echo "$i"|grep /$) ]; then
 i=`echo $i|sed -e 's/^([^ ]*)/$/1/p' -e d`
 excludeopt="${excludeopt} --exclude-dir=^$i"
 else
 excludeopt="${excludeopt} --exclude=^$i"
 fi
 done
fi

# virus scan
CLAMSCANTMP=`mktemp`
clamscan --recursive --remove ${excludeopt} / > $CLAMSCANTMP 2>&1
[ ! -z "$(grep FOUND$ $CLAMSCANTMP)" ] &&

# report mail send
grep FOUND$ $CLAMSCANTMP | mail -s "Virus Found in `hostname`" root
rm -f $CLAMSCANTMP

# chmod 755 virusscan

# mv virusscan /etc/cron.daily/ ※毎日自動実行させる
グループ作成
以下グループを作成する場合
gid : 200
group : user
# groupadd -g 200 user
作成されたグループの確認
# cat /etc/group | grep user
user:x:200:
ユーザ作成
以下ユーザを作成する場合
uid : 1101
group : user
username: testuser
# useradd -u 1101 -g user testuser

作成されたグループの確認
# cat /etc/passwd | grep 1101
user:x:200:
ミドルウェアインストール
apache
mysql
python
centosでyumが使えない現象
以下のようなエラーがでて、yumが使えない。
以下のようなエラーがでて、yumが使えない。

[root@localhost ~]# yum -y install wget
Loaded plugins: fastestmirror
Loading mirror speeds from cached hostfile
Could not retrieve mirrorlist http://mirrorlist.centos.org/?release=6&arch=x86_64&repo=os error was
14: PYCURL ERROR 6 - "Couldn't resolve host 'mirrorlist.centos.org'"
Error: Cannot find a valid baseurl for repo: base

また、defaltgatewayの設定が抜けているとこういうことが起きる。
lamp環境インストール
# mysql インストール
./configure --prefix=/usr/local/mysql
              --enable-assembler
              --with-charset=utf8
              --with-unix-socket-path=/data/mysql/mysql.sock
              --with-mysqli=/usr/local/mysql/bin/mysql_config
              --enable-embedded-mysqli
              --with-embedded-server
              --with-extra-charsets=binary,utf8,cp932,eucjpms,ujis,ucs2,latin1,sjis
              --without-readline

ここと同じ状況になった。。。

http://kaizou-papa.jugem.jp/?day=20080609

http://wadslab.net/wiki/index.php?MySQL%A4%F2%A5%BD%A1%BC%A5%B9%A4%AB%A4%E9%A5%A4%A5%F3%A5%B9%A5%C8%A1%BC%A5%EB

# apache2

http://codenote.net/centos/139.html

./config --prefix=/usr/local/openssl --openssldir=/usr/local/openssl shared

#php

http://blog.quall.net/linuxserver/1529/

CFLAGS=-O3
./configure
 –with-apxs2=/usr/local/apache2/bin/apxs
 –with-libxml-dir
 –with-openssl
 –with-zlib
 –with-gd
 –with-jpeg-dir=/usr/lib/
 –with-png-dir=/usr/lib/
 –with-freetype-dir=/usr/lib
 –with-pear
 –with-xmlrpc
 –with-pdo-mysql
 –with-mysql=/usr/local/mysql
 –with-mysqli=/usr/local/mysql/bin/mysql_config
 –with-config-file-path=/etc
 –with-config-file-scan-dir=/etc/php.d
 –enable-gd-native-ttf
 –enable-gd-jis-conv
 –enable-calendar
 –enable-exif
 –enable-mbstring
 –enable-mbregex
 –enable-zend-multibyte
 shared

.:/usr/local/lib/php/PEAR:/usr/local/include/php/

[Mon Jan 28 00:12:30 2013] [error] [client 111.87.58.18] PHP Fatal error:  require(): Failed opening required 'wiki/lib/pukiwiki.php' (include_path='.:/usr/local/lib/php/PEAR:/usr/local/include/php') in /usr/local/apache2/htdocs/wiki/index.php on line 23
システムログ
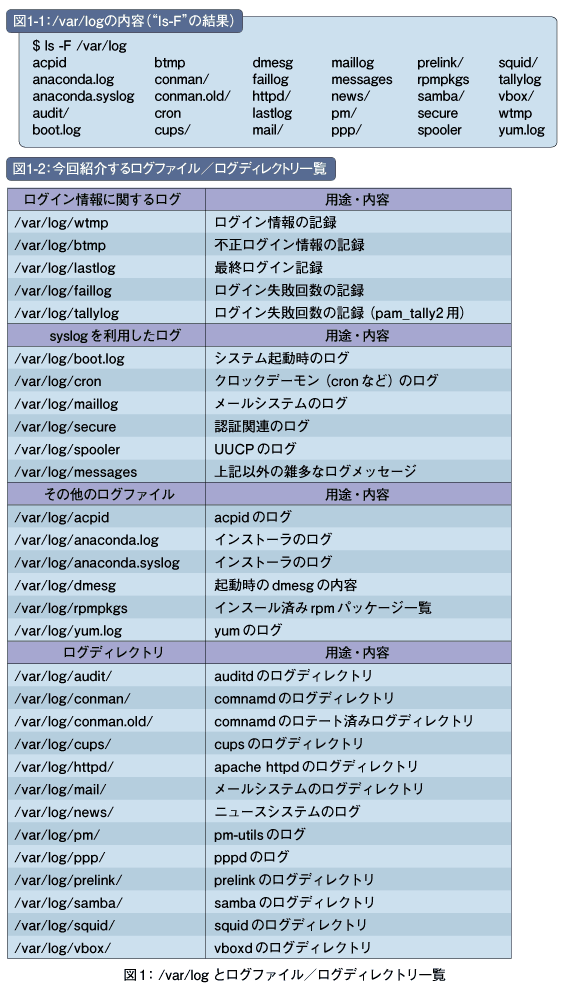
/var/log/btmp
失敗したログインの情報を見ることができます。lastb コマンドで見れる。
/var/log/wtmp
これはバイナリなので中を見たいときはwhoコマンドでみる。#who /var/log/wtmp
/var/log/lastlog
各アカウントの最終ログインの一覧を見れる。lastlogコマンドで見れる。